How To Install Clay Brick Pavers
Tools PreparationArrange to hire a brick masonry saw and flat plate vibrator prior to the day you begin your paver installation. You will need some basic working tools such as carpenters level, tape measure, rubber mallet, rake, shovel, timber stakes, string line, broom, safety eye wear, 1 x ten foot length and 2 x lengths of one inch diameter piping. |
 |
Site Preparation
The single most important phase of the entire pavement installation happens to be the preparation of the subsoil and paver bed. The overall strength of the pavement system is dependent upon the correct preparation and placement of the subsoil and base materials.
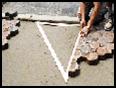
Mark out the area to be paved by placing wooden stakes around the area and then spray paint from an aerosol can to identify the area to be dug out.
Drainage
Set out the grade levels by securing string line between the stakes, making certain to slope the grade away from any building structure. This will ensure that drainage from rainfall will not seep towards any adjacent building structures. Set up the grade at two inches in height for every eight feet of pavement length.
Excavate Site
| Now excavate the top soil and sub soil within the staked out area with the shovel and to a depth of at least ten inches in total. This will allow for a base material of five inches to be placed at the bottom of the excavated trench, next will be one and a half inches of setting sand to be placed on top of the base material and then allow three and a half inches for the thickness of the clay brick paver to be placed on top of the setting sand. | 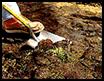 |
Compaction Of Base Materials
Compact the bottom of the trench with the plate vibrator machine to make a firm foundation for the base materials. Place ¾ inch quarried gravel as the base material and compact it with the plate vibrator machine once again to provide a solid base for the setting sand to sit above it.
Setting Sand
Lay the 2 pipe lengths eight feet apart from each other and parallel to each other. Place the sand to a height of one and a half inches in between the two lengths. Then using the 2x4 wooden length, be sure to level out the sand. Add more sand if you see any low spots. Make sure to level out any high sand spots too. When you have finished leveling the sand make sure that you DO NOT COMPACT THE SAND – because you will compact the bedding sand later on together with the clay brick pavers when using vibrator in the final stages of the installation. The final compaction of the pavers and bedding sand is necessary to allow for the proper interlocking method to take effect. It is the basis for the strength of the interlocking pavement system because the movement of the sand into the bottom and in between the clay paver joints makes them bond firmly together and bear the loads applied to the clay brick pavers in unison.
Installing Clay Brick Pavers
After you have finished placing the setting sand correctly, you may begin to install the pavers. Begin installing pavers from the center of the site and work toward the outside edges of the pavement. Reason for this is to allow the trimming pieces to be at the outside edge of the pavement. Place the pavers about one eighth of one inch apart from each other. Check the string line to make sure you are moving straightly once every five feet of forward progress. Make any adjustment by resetting the pavers using a screwdriver so they sit straight. After the pavers are installed straightly, you need to install the edging material to prevent the paver from moving out of place. The edging material needs to be secured in place before you place the bedding sand and pavers.
Compaction Of Pavers And Sand
 |
After you have placed all the pavers correctly, you need to add sand to fill the spaces between the pavers. Use a broom to sweep the sand in between the pavers. Compact the brick pavers with the plate vibrator with two passes over the top of the paver. Check the joints again to make sure they are all filled with sand after each compaction run and place more sand in the joints if needed. |
Properly installed pavers need little maintenance. If surface blemishes start to show after some time, you can use cleaners to remove it or the stains will disappear after some time due to natural weathering.