Granite Pavers Installation
The rare beauty and endless variety of granite paver colors, shapes and patterns has modernized many homes. Most of these home improvements were in the achieved using aesthetically pleasing designs for walkways, patios, driveways, pool decks and many other interior and exterior applications.
A key advantage of granite pavers is the simple installation procedure applicable when creating indoor or outdoor areas. There is a basic guide to be followed when installing granite pavers. You can have them installed professionally, or install them yourself.
The beauty of pavers will enhance the look of pool decks, patios, walkways, or driveways. For people with budget restraints, it would be cheaper to install granite pavers themselves if there are capable of following the installation guide:
|
 |
A detailed step-by-step analysis of installing granite pavers:
PLANNING AND LAYOUT: This involves deciding which shape, color and pattern of granite pavers will be adopted in paving the driveway, patio or walkway. Furthermore, a detailed sketch of the overall area is imperative in determining product quantities and a budget forecast.
It is imperative for the driveway or patio to have a gradient slope to prevent pools of water from forming.
CALCULATING THE AMOUNT OF PAVERS TO BE USED: By multiplying the length of the area by the width of the area (Length x width), the total size of the area will be determined in square meters. It is important to note that when ordering the amount of pavers, an extra 5-10 % should be allocated for cutting and replacement if damaged in the future.
EXCAVATION: Excavating removes the top layer of soil and prepares for the positioning of a gravel-base. However before commencing any excavation, it would be wise to have a local utility company check that there are no cables or wires running under the ground that is to be excavated. Once this has been done, the area to be excavated should be marked out.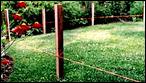 |
The second step is to excavate the least required depth depending on your application. Generally speaking, walkways must have a minimum area of at least 3 inches excavated wider for the area, whilst driveways need a minimum of 6 inches when using granite pavers. |
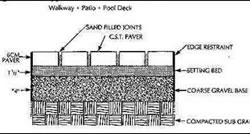
| BASE PREPARATION: The base preparation is the most vital step in the whole installation process. To ensure a life-long installation, it is most important to make sure that the base material, thickness and compaction are appropriately adapted to the application using a vibrating gas powered plate compactor. | 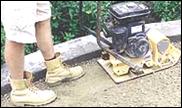 |
Hence you must ensure that the crushed stone or gravel varies in size and shape. This will aid compaction of the base material. In Addition it is recommended that the base material comprise of three-quarter quarry process.
EDGE RESTRAINTS: The next step is to place the borders for the chosen design layout. Implementing edge restraints ensures no separation or movement of the granite pavers. The edging is arranged directly on top of the quarry process base and fixed firmly with 10 inch steel spikes. For walkways and patios, use 1 spike for every two feet. Meanwhile for driveways, one spike should be used per foot.
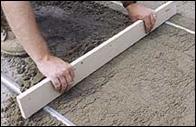
SAND BEDDING: Setting a bed of concrete sand or granite stone dust can now be spread on top of the compacted base. Sand bedding protects the erosion of sand joints and provides bedding for your granite pavers to settle into nicely. The first step in sand bedding is to spread a layer of sand between 1 - 1.5 inches thick. Secondly, use a screening board to level the sand evenly. |
 |
INSTALLATION OF PAVERS: We are now up to the easiest part, laying the pavers. Firstly, set the pavers down in the desired pattern whilst making sure that the granite pavers are close to each other. Once this has been done, use a mechanical compactor to help set the pavers into the sand bedding.
| COMPACTING JOINTS: The final step is to spread and sweep sand over the surface in order to fill up the joints. The most useful method is vibrating with a plate compactor as this drives the sand between the joints and thus levels out the final surface. It is necessary to sweep over the surface routinely. | 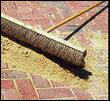 |