Starting Tip
We recommend that you purchase about 15% more Mexican Pavers than what you measured up for your project. It’s a great idea to have spare boxes stored in your garage, incase you need to carry out some repairs in years to come, breakage during installation or for another project. |
|
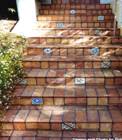
In terms of your grout choice for Mexican Pavers, it is recommended that use a similar color to your pavers color. The reason for this is that a contrasting colored grout can tend to take some of the attention away from the pavers. Specific grout for Mexican Pavers is now widely available on the market!
Installation Steps
Following is a quick installation guide for grout-set Mexican Pavers:
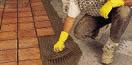
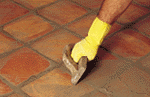
- Be sure to wear rubber gloves, for this will prevent the pavers from slipping out of your hands.
- Place mesh between the existing slab and where you will begin laying the pavers.
- Start off by putting in your border, and lay out the pavers to see how it will all fit in.
- Using a thin tile adhesive, work it over the top of the mesh with a flat trowel. This kind of adhesive cures in 10 minutes, so only work in 4 inch squares at a time.
- Now spread some of the adhesive, using the notched side of the trowel, onto the underside of the pavers.
- Lay the pavers onto the adhesive covered mesh. Spacers are not necessary; using your own eye is good enough. Tap the pavers in using a rubber mallet.
- If pavers need to be cut to fit into odd spaces, use cardboard to create a template of the exact cut you need.
- Always check that the pavers are level and straight.
- Once all pavers are laid in, they need to set overnight, so be sure not to walk on them at all. Clean all excess adhesive from the pavers.
- When applying the grout, only do a small area at a time, for it also dries quite quickly. Smear it over the area, making sure that all joints are being filled.
- After about 10 minutes, wipe of excess grout, using a sponge. Rinse the sponge and use it to finish of the grout into a smooth u-shape.
- After about three weeks it is highly recommended that you seal your Mexican Pavers.
|
|
|
|